It’s always exciting to get an acoustic guitar and even more exciting when you’re a new player and get your first acoustic guitar. However, beginners will often forget some basic care and maintenance of their new instrument.
For those that do remember, one of the most important things to take care of while cleaning and maintaining your guitar is its fretboard. The fretboard is a critical part to focus on while cleaning because it is where you are constantly moving your fingers around, pressing the strings, and leaving the oil and dirt from your hands.
The good news is that keeping the fretboard clean is not too difficult. Plus, keeping it clean will make the guitar have a better feel and will make it play a little better.
Cleaning the Fretboard on Your Acoustic Guitar
Fingers will spread dirt, oil, and even a little sweat. Hopefully, no blood or tears, though. (Get it? Blood, sweat, and tears. Anyways…) This dirt and oil will build upon the fretboard and stick to the frets.
So, how do you go about cleaning your fretboard?
Remove the Strings from the Acoustic Guitar
There are lots of different ways people like to do this. Some people will loosen the strings by turning the tuning knobs and cut the strings with a wire cutter. Usually, my preferred method is to keep loosening the strings until I can remove them from the tuning knobs. Gently unwrap the strings as you pull them off the tuning pegs.
Most acoustic guitars have bridge pins that you will need to remove to get the strings out of the bridge. The bridge pins are usually made of plastic, so don’t be too forceful. I’ve definitely broken a few before.
Gently pry the bridge pins out with a pair of pliers or a screwdriver. Use a cloth to protect whatever surfaces will be in contact with the pliers to prevent scratching.
Once the pins are removed, you can pull the strings out from the hole. If you haven’t cut the strings, some players will save the strings once removed. These players will wrap them up in a coil, like how the new strings come, and keep the strings in their guitar case if they have a broken string emergency and don’t want to pull a single new string from a set of new strings.
Examine Your Acoustic Fretboard
Acoustic fretboards are almost always made with ebony. The second most common wood type is rosewood. Ebony is an exotic black/brown hardwood that comes from Africa and Asia. It is dense and will sink in water. Ebony wood is tough to break and has a rich dark color that contrasts beautifully with the silver frets. These characteristics are what make Ebony ideal for use on a fretboard.
There are a few unique types of fretboards that I’ve come across. Martin has a line of acoustic guitars made from a composite material they dubbed as “Richlite.” The Martin OMXAE is one example.
Then there are guitars entirely made from composite material, like Rainsong guitars. The idea of using carbon fiber is to prevent issues like warped necks, glue joints that fail over time, buzzing notes, wood cracks, and humidity-related issues.
Whatever the material used, these fretboards need to be cleaned. They can be cleaned using the same process.
Gently Scrub Using #000 Steel Wool
Here is how to use steel wool to clean your acoustic guitar fretboard and neck.
Once the strings have been removed, pull out a piece of #000-grade steel wool for a deep scrub. The #000 grade of steel wool is the second finest grade you can buy (#0000 is the finest) and can be found at hardware stores. The packing may indicate that it is designed to remove wax or polish of furniture in combination with soap and water. It’s also okay to use #0000 grade, but don’t use more coarse steel wool than #000.
The fretboard on your guitar is an unfinished piece of wood. They are often conditioned at the factory with boiled linseed oil. The ebony will have no lacquer or finish cot of any kind, so while you should scrub gently, you don’t have to worry about scrubbing off any exterior coating while you are cleaning the wood.
#000 is a very fine grade, meaning that it is not coarse or rough at all. If you use a ball of more coarse steel wool, you will likely end up scratching the wood instead of cleaning it. Don’t let that happen! Also, please don’t use sandpaper. The fine-grade steel wool will safely get off all the buildup and gunk accumulated on the fretboard.
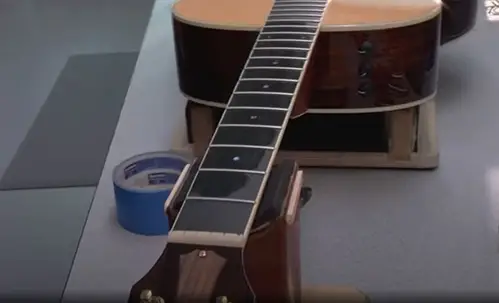
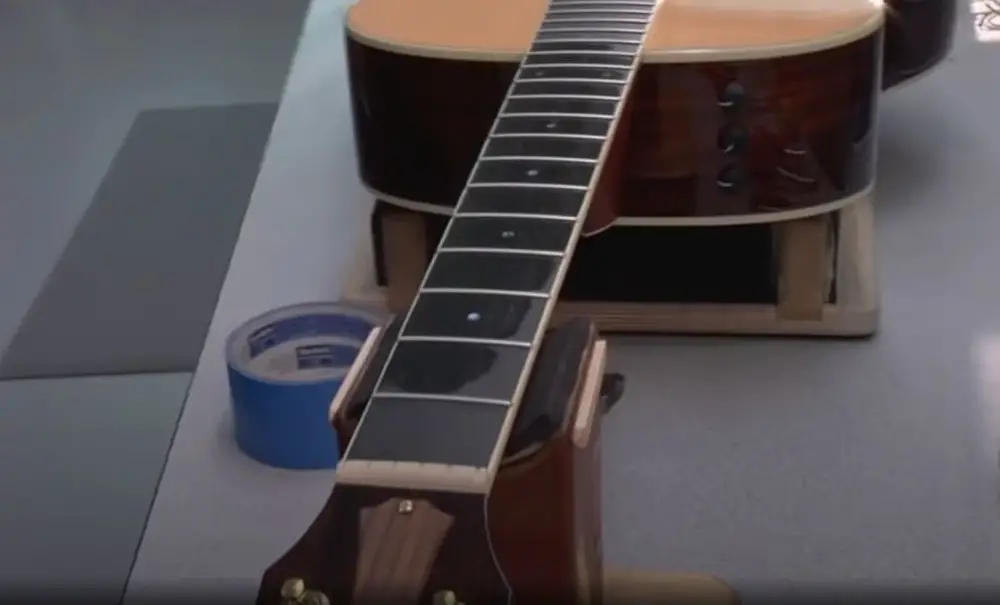
Once you have your steel wool on hand, you will want to set your guitar up on a table or soft surface with a towel or other soft material lying across it. I find it helpful to put a pillow under the neck as well.
I recommend using a table where you can shine a nice bright light onto the guitar so you can see what you’re working on with no problem.
Keep in mind that pieces of the steel wool will fall off while you’re cleaning the fretboard and can make a big mess. If it’s nice enough weather outside, I like to do this on my back patio or over the grass. That way, I don’t have to worry about where the pieces fall, and clean up is much easier.
The strings have already been removed, but it’s a good idea to mask off the soundhole before you start scrubbing. It is difficult to get out debris that falls in there. Just think about when you drop a pick in there. Now multiply that by like a 100.
Now you’re ready to take a piece of the steel wool and start gently scrubbing the fretboard in a circular motion. Start with a single fret in the middle of the fret, and work your way back and forth within the fret. Make sure to get up against the fret wire well. Do this for each fret.
I want to reinforce getting right up against the fret wires. The gunk can really build up in these little corners. You don’t have to be super gentle with the steel wool if the gunk is built up. Use a medium pressure if needed to get the fret clean.
Secondly, be sure not to scrub the side or back of the neck, which likely does have a clear finish coat on it. This stands for the rest of the guitar as well. The steel wool will damage the clear coat and leave scratches.
Once you are done scrubbing all the frets and fret wires with the steel wool, take your guitar outside (if you’re not out already) and blow off the dust and all the little pieces of steel wool. If you have a mini electric blower, now is an excellent time to use it.
Look for pieces of steel wool that might have gotten stuck in the fret wire. No big deal; they should pull out easily.
When I’m cleaning the fretboard, I like to start at the first fret, by the nut, and work my way up to the highest fret. You’ll notice that these lower frets tend to get a lot more dirt built upon them than the higher frets. That’s because they are usually the most used frets. If I start with the most used frets, I start with the hard part, and it gets easier as I go along.
The basic chords that we learn as beginners are all based around the first three frets, so for most players, frets 1 through 3 will need more focus than the other frets. If you like to solo, you’ll probably need to pay attention to those higher frets.
Check Your Frets
Now that the fretboard has been cleaned, it is an excellent time to look at the fret wires while the strings are off. Look for and damage where the fret wire does not have a smooth surface. It’s not uncommon for them to get an indentation from a string pressed against them. Acoustic guitars will commonly have indents in the fret wires around the 2nd and 3rd frets.
If the indents are especially deep, this may affect the guitar’s sound. You may experience an unwanted buzzing sound depending on how severe the damage is.
I don’t recommend fixing this type of damage yourself by filing down the fret wire or any other method. Take your guitar to a Luthier who can properly set the fret wires.
If you try to file down just the one fret wire, it will become uneven and not uniform compared to the other fret wires. You would have to readjust by filing down all the other fret wires and do this without ever touching the fretboard with whatever you’re using to file with. It is also challenging to get it perfectly parallel with the fretboard. This work takes precision and is best left to a professional who has the right tools and experience.
Preventing this type of damage from ever happening is a better strategy that will save you money. The key is to try and play gently, only applying the amount of pressure needed to hold down the string.
If you use a death grip and your knuckles turn white when fingering the chards, you are much more likely to damage the fret wires. Ease up a bit. However, if the fret wires do get damaged, they can be fixed. It’s not the end of the world for your guitar. The fret wires are, after all, just a piece of thin metal wire glued into a slot that is cut into the fretboard.
Oil & Condition the Fretboard
Once the fretboard is scrubbed clean and you’ve removed any dust, give it a good wipe with a microfiber cloth. The fretboard should have a nice clean shine to it now. Most guitar manufacturers recommend rubbing a small amount of boiled linseed oil, lemon oil, or fretboard conditioning oil to help keep the wood moisturized. This isn’t always needed, but it is good to do if you notice places where the wood looks dry.
Clean the Rest of the Acoustic Guitar
It’s an excellent time to clean the rest of the acoustic guitar while you have the strings off. Some people use Windex, while others use a specialty cleaner & polish. I have a Taylor, so I use the Taylor guitar polish, although other brands would work just fine.
The fretboard does not have a finish, so avoid getting any of the polish on this area. It’s recommended to work in one area at a time. Start with spraying a small amount on the body of the guitar. Buff it with a microfiber cloth, move onto the back of the neck, and then the head.
Also, I recommend wiping down the neck before applying the polish. This is a place where dust tends to collect, and it’s hard to get to with strings on the guitar, so clean it while the strings are off.
Once you’ve polished the guitar, it’s time to get those strings back on. The guitar will have a noticeably different feel and sound to it.
Maintaining Your Acoustic Guitar
If you are a professional musician or play many gigs, your guitar gets dirty from those sweaty hands on a pretty regular basis. If you only occasionally play the guitar, you will have to do the same maintenance, just not as often.
Professional players out on tour may change strings after one or two shows, whereas you can wait months or maybe even a year or two if you only occasionally play at home. Regardless of how often you play or where you are playing, I highly recommend wiping down the neck and strings after you are done playing for the day.
I use GHS Fast Fret. (Amazon affiliate link)
GHS Fast Fret comes with an applicator and a microfiber cloth to wipe with after being applied. This will help remove the oil and sweat from your playing and prolong the life of your strings. It comes in a small metal tube, about 3 -4 inches in length. It’s small enough that I can keep one in each of my guitar cases.
If you wipe down your guitar every session, your neck will stay cleaner, and your strings will last longer. It’s worth the minute or two it takes, and that’s if you’re taking your time. Wiping down your guitar can be done much faster.
I understand if guitar maintenance hasn’t been a priority for you. Most of us want to pick up the guitar and play, but cleaning your fretboard and guitar can make it much more pleasant to play.
If you’re out playing gigs and shows, it isn’t an option. Your guitar needs to be cleaned in order to stay at peak performance.
