
Loudness normalization in Audacity is a feature that allows users to adjust the perceived loudness of an audio file to a standardized, uniform level while keeping the dynamic range of the audio. Audacity has the choice of RMS or perceived loudness for loudness normalization.
Root Mean Square, usually abbreviated as RMS, is a method of determining a numerical value for the average sound level of a waveform. This value, referred to as the RMS level, is a close approximation of how loud the audio sounds. In Audacity, the RMS level is represented by a lighter blue color when a waveform is opened.
Perceived loudness is measured in LUFS. LUFS, or Loudness Unit Full Scale, is similar to RMS, except it takes into account your ear sensitivity. The human ear is more sensitive to some frequencies than others.
If you’re interested in learning what else Audacity can do, check out this article on using Audacity as a DAW.

When Is Loudness Normalization Needed?
Loudness normalization is commonly needed when multiple audio files have inconsistent loudness levels, and you want them to sound the same loudness but also keep their dynamic range.
This is particularly useful when audio tracks that have been recorded in different locations or with different equipment need to be merged together.
For example, if you record a podcast with two hosts in different locations, one might sound very loud and the other quiet. With loudness normalization, the audio tracks can be adjusted to sound like they’re at the same volume. The perceived loudness will become the same for both sources, but the loud and quiet parts of each recording will keep their range, ensuring that the audio content remains intact and the listener hears the intended experience.
Another example is when you have an interviewer approaching people “in the street” and want to mix the results of the interviews in a studio, perhaps adding a host to discuss what was said. You would use loudness normalization to make all the segments the same volume level so there wasn’t a sudden spike or drop of loudness between the segments recorded in different locations, making the audio a lot more pleasant to listeners.
Loudness normalization can also be used to boost the volume on a very quiet track. This ensures that the audio is audible and consistent with the other tracks.
There are a few more uses for loudness normalization that I discuss in my Beginner’s Guide to Audio Normalization
What’s The Difference Between Normalization And Loudness Normalization?
Normalization and loudness normalization are related but slightly different processes.
Normalization is a process of adjusting the amplitude of an audio signal so that the peak amplitude reaches a specified level; usually, the peaks are set to 0 dB. This is typically done by finding the highest peak in the audio file and then applying a gain adjustment, resulting in bringing the peak to the desired level.
Audio peaks don’t correlate well with perceived loudness. If you normalize all of your music, some songs will still be louder than others.
Loudness normalization, on the other hand, is a process of adjusting the perceived loudness of an audio file to a standardized level. The purpose of loudness normalization is to ensure that audio files have consistent loudness levels. The loudness level is a measure of the perceived loudness of an audio file and is often measured in LUFS (Loudness Units relative to Full Scale).
In short, Normalization adjusts the amplitude of an audio signal to a specified level, while loudness normalization adjusts the perceived loudness of an audio file to a standardized level.
How to Normalize Audio in Audacity
This method shows you how to use normalization, not loudness normalization. This will set your audio so that the peak amplitude reaches a specified level. Refer to the next section if you are interested in loudness normalization.
Steps to Normalize Audio in Audacity:
- Open an audio file
- Select the audio file (Ctrl+A or Cmd+A)
- From the menu, select Effect > Normalize…
- In the pop-up menu, select your desired options and press “Apply”
Audacity will now normalize your audio. It will show the progress and estimated time remaining as it processes the audio.
Normalization Options
The information on options is taken from Audacity’s manual website here.
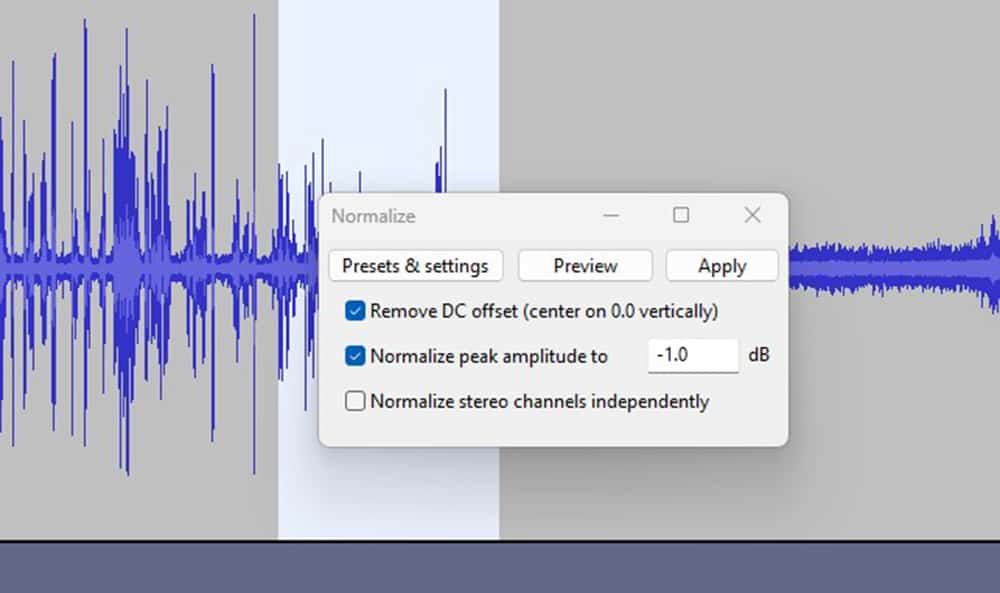
Remove DC Offset
When the “Remove DC offset” option is selected, it attempts to center the waveform on the 0.0 amplitude level by removing any DC offset. This is done by calculating the average of all the sample values in the selection and subtracting that average value from all the samples.
Removing any DC offset is important, as it can cause clicks or distortion and limits the headroom available for normalization, resulting in a lower overall loudness. If you’re certain that your tracks do not have any offset, disabling this option will speed up the normalization process.
Normalize Maximum Amplitude to
The “Maximum Amplitude” setting allows you to specify the highest amplitude level you want the processed selection to have. The default setting is -1 dB, but you can change it to any value. The setting is remembered for future use of the normalize function.
A level of -1 dB is just below the maximum amplitude (0 dB), which is the highest level before clipping, and it allows for some headroom for effects and distortion-free playback on all equipment. If you want to normalize to a lower amplitude, you can enter a more negative value, like -3 dB. Entering a positive value is not allowed and will disable the “Apply” and “Preview” buttons.
Normalize stereo channels independently
The “Normalize stereo channels independently” option allows you to choose how the audio is treated in stereo tracks. By default, this option is unchecked, meaning that Normalize will adjust the level of both channels of a stereo track by the same amount. This mode preserves the original stereo balance of the audio.
If this option is checked, Normalize will adjust the amplitude separately for the left and right channels of a stereo track. This mode allows for adjusting each channel independently and can be useful if the stereo balance needs to be adjusted.
How to Use Loudness Normalization in Audacity
This method shows you how to use loudness normalization.
Steps to Normalize Audio in Audacity:
- Open an audio file
- Select the audio file (Ctrl+A or Cmd+A)
- From the menu, select Effect > Loudness Normalization…
- In the pop-up menu, select your desired options and press “Apply”
Audacity will now normalize your audio. It will show the progress and estimated time remaining as it processes the audio.
Loudness Normalization Options
The information on options is taken from Audacity’s man website here.
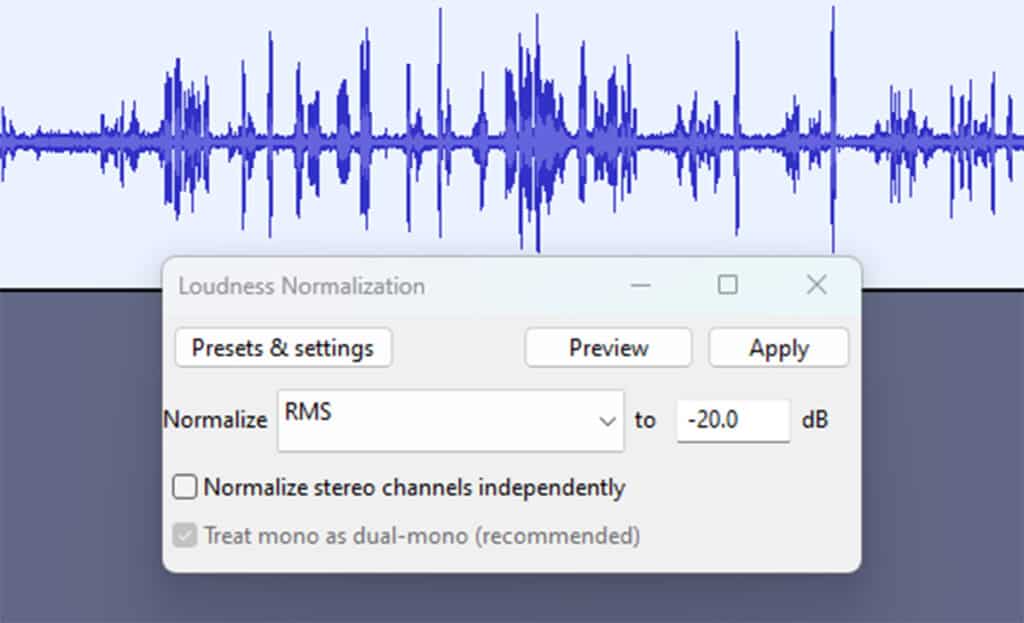
Normalize
The loudness normalization process in Audacity offers two options for adjusting the loudness of audio files: “perceived loudness” (default) and RMS.
- Perceived Loudness: “Perceived loudness” is the default option, and it adjusts the loudness to -23 LUFS (the EBU standard), which results in audio that is approximately 25% of full scale.
- RMS: The RMS option allows the user to adjust the amplitude such that the resulting audio has the desired RMS level. The default setting for RMS is -20dB, which also results in low-level audio.
Normalize stereo channels independently
The “Normalize stereo channels independently” option allows you to choose how the audio is treated in stereo tracks. By default, this option is unchecked, meaning that Normalize will adjust the level of both channels of a stereo track by the same amount. This mode preserves the original stereo balance of the audio.
If this option is checked, Normalize will adjust the amplitude separately for the left and right channels of a stereo track. This mode allows for adjusting each channel independently and can be useful if the stereo balance needs to be adjusted.
Treat mono as dual-mono
“Dual mono” refers to a 2-channel audio track that has identical audio in both the left and right channels. A “dual mono” track sounds identical to a mono track that has the same audio as either channel of the “dual mono”. However, the EBU R 128 specification does not take this into account, and the 2-channel “dual mono” track will measure at 3 dB higher than the 1-channel version, even though they sound identical on playback. To address this, Audacity allows you to measure a mono track as if it were a dual stereo track, giving the same loudness measurement for a mono recording, whether it is one-channel mono or 2-channel mono.
When this option is checked (default), Audacity internally doubles the amplitude of pure mono signals during the LUFS calculation. This is necessary to make mono tracks sound equally loud as dual-mono or stereo tracks on all known audio drivers since they ignore pan law.
